Colour B4 Extra Strength Review - Part Two Using the Dye Remover and helping to prevent re-oxidation
If you haven't already read it, you should really check out Part One of this as it details preparation, it can be found here
Well it is done and I am rather impressed with the results, even if I do say so myself! There were a few things that I did differently this time and I will go through the entire process and then share the finished result.


Well it is done and I am rather impressed with the results, even if I do say so myself! There were a few things that I did differently this time and I will go through the entire process and then share the finished result.
You will need;
- Sectioning Clips
- Comb
- Colour B4 Extra Strength
- Cling Film
- Two beanie style hats
- Hair Dryer
- Shower
- Bucket Loads of Patience
Step One
Start by sectioning your hair and clipping the upper portion to the top of your head. If like me you have long hair, it is best to start with the underneath layers. I found the easiest way to apply the remover was to take a small section of hair (no more than an inch wide) and squirt a small amount into my gloved hands and start with the ends carefully rub it in. I usually applied 3 squirts to each section; end, mid length and root. Time should be taken to ensure each squirt is completely rubbed in and the section is fully saturated before moving on.
Clip back each of the soaked sections and gradually move from the underneath to the top of the head. Although it's tempting to rush at this point, you need to make sure that you have fully covered all of your hair, so be patient!
Step Two
Now it's time to massage your scalp and brush through your hair. You really should use a wide toothed comb for this part as it is a hot mess of tangles at this stage. Again you need to take your time and make sure the remover is fully and evenly distributed through the hair.
Step Three
Now pile all the hair on your head and wrap in clingfilm - yep that's right clingfilm
Over the top of your clingfilm you need to put on your two beanie hats, I promise this isn't some ploy to make you look a fool!
If you've ever had your hair coloured or bleached at the hair dresser, you will know that during the waiting period, you are wheeled under the drier. There is a reason for this, heat helps to activate the chemicals used. In fact, if you read the Colour B4 packaging, it tells you to sit in a room away from drafts - this stuff doesn't work if it's too cold! So it makes sense that by keeping in the heat, you can help the remover do it's stuff.
Step Four - Optional
Red and dark brown are tricky colours to shift, I knew from using Colour Rewind last year that I could do with some extra help - the hair dryer!
For the next 50 minutes, I sat with my clingfilm/hat helmet and used the hairdryer on it's hottest setting all over my head. My arms were killing as I had to keep moving it in small circular motions across the whole of my head. It was hotter than hell and a few times I thought I was going to just give up, but I persevered and kept at it.
If you do decide to do this step, you need to keep checking your hair and make sure not to keep the hairdryer in any one area for too long (no one wants melted clingfilm in their hair!). If you start to feel faint or dizzy, stop straight away.
When I removed the hats and cling film I was a little shocked at just how much lighter my hair was. I was also a little anxious as this is a LOT lighter than my natural hair.
Step Five
This is probably my most hated step of all, rinsing. I spent about 40 minutes rinsing this stuff from my hair. I used hot water as I know that red dye molecules fade under hot water as they are smaller than most other colours and fall from the hair shaft when shrunk with hot water. I then used half of the buffer solution and rinsed again - if you have used this stuff before and know that re-oxidation / darkening of the hair after a few days is a problem for you, make sure you follow the step below.
Step Six - Optional
When I used Colour B4 last year, my hair darkened within a day or so each time :( It wasn't lots, but enough for me to notice and feel annoyed that I had become a few shades darker. This is called re-oxidation and is where small amounts of the old hair dye become trapped in the shaft and expand when exposed to air - this darkens the hair again. Although not enough rinsing is thought to be the most common cause, Scott Cornwall admits that some hair types are more prone to it, but they have been unable to pin point what kind.
I scoured the net and found some handy tips and tricks to try and minimize the amount of re-oxidation that would happen;
- Double the amount of rinsing time, this should ensure all dye molecules are out of the shaft
- Before using the buffer solution for the second time, hop out of the shower and dry your hair completely, you can use a hair-dryer to speed things up. This step not only helps prevent re-oxidation, but you can assess your colour
- After using the second buffer solution, run a bath of hot (hot enough to tolerate laying in) water and soak your entire head for 10 minutes, continuously running your fingers through the ends (underwater) to agitate the dye.
Step Seven
Once you have followed all the instructions on rinsing and buffering, it is time to dry your hair and assess the results!
When I initially dried my hair after the first buffer, I completely panicked as it was way lighter than my natural mousy brown hair! Colour B4 is not to blame for this lightening, all the vibrant reds I use have a degree of peroxide in them that bleaches the hair to achieve a more vibrant tone - this lighter than natural colour I have been left with is simply the Colour B4 doing what it's designed to do and removing all dye from my hair.
I actually made the decision to let my hair re-oxidise a bit to try and darken it and skipped the hot bath. It darkened slightly, but maybe by only 1 shade.
Over-all I am really happy with the results of my Colour B4, I genuinely believe that keeping the hair warm during it's activation phase really helped with the lightening process.
As you can see my natural roots coming through, I am going to have to make the decision whether to try and dye it back to a closer tone to my natural hair (boring mousy brown) or leave it be. We are about to start IVF and I don't really want too many extra chemicals in my system, so I may decide to just leave it be and hope that as my roots grow it isn't too noticeable.
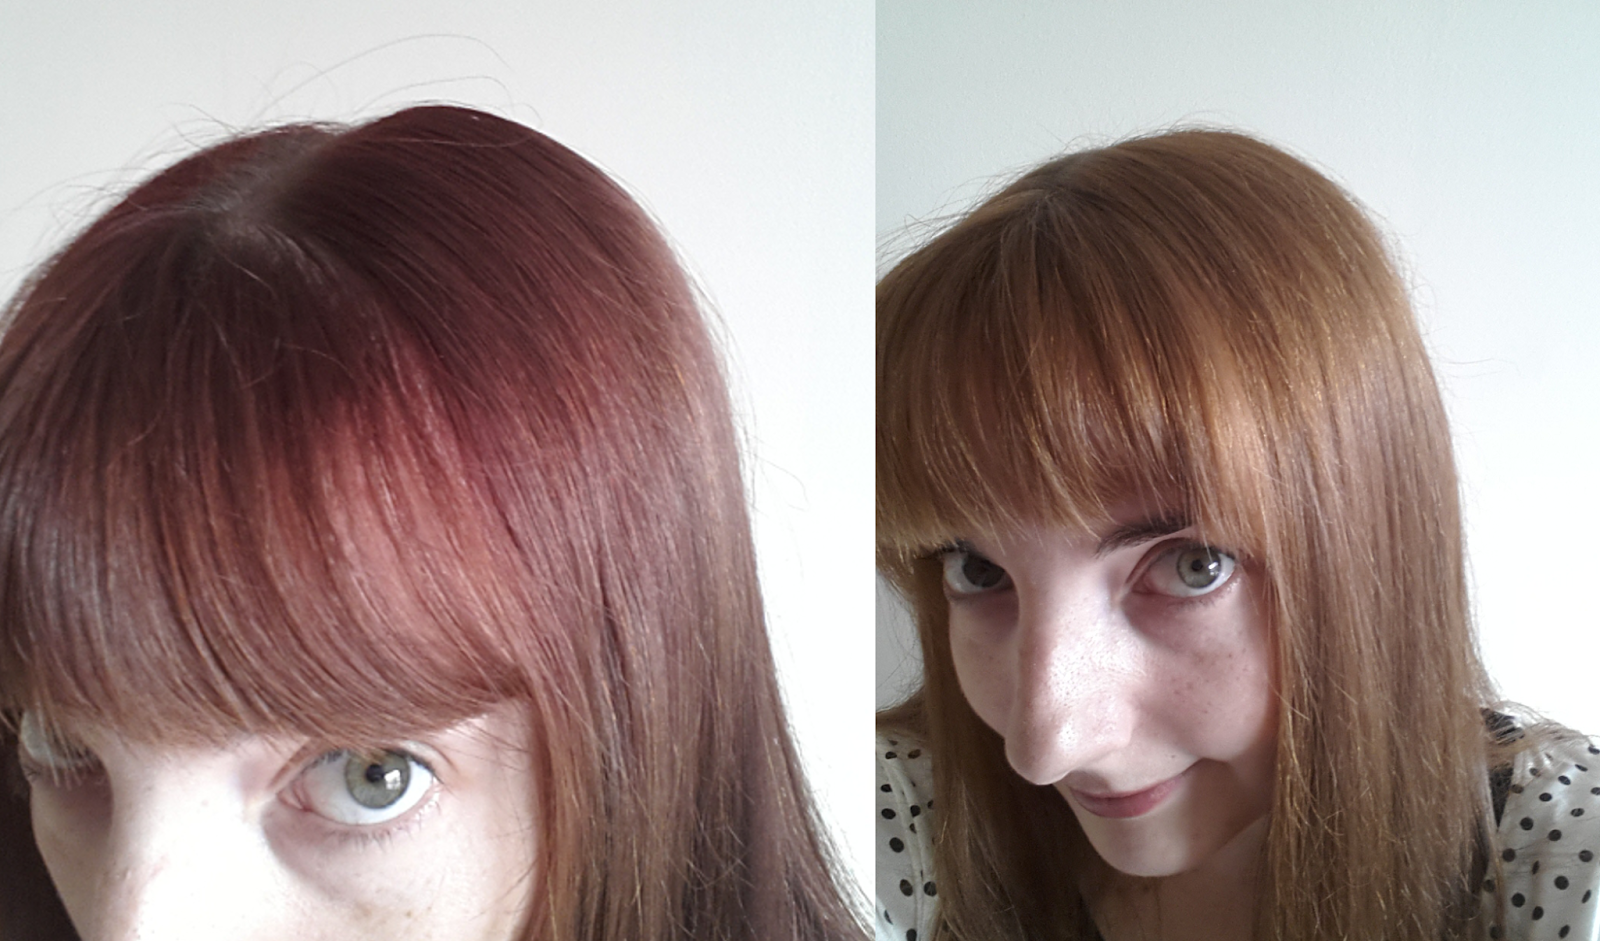 |
| Before and After |
 |
| Before and After |
Comments
Post a Comment